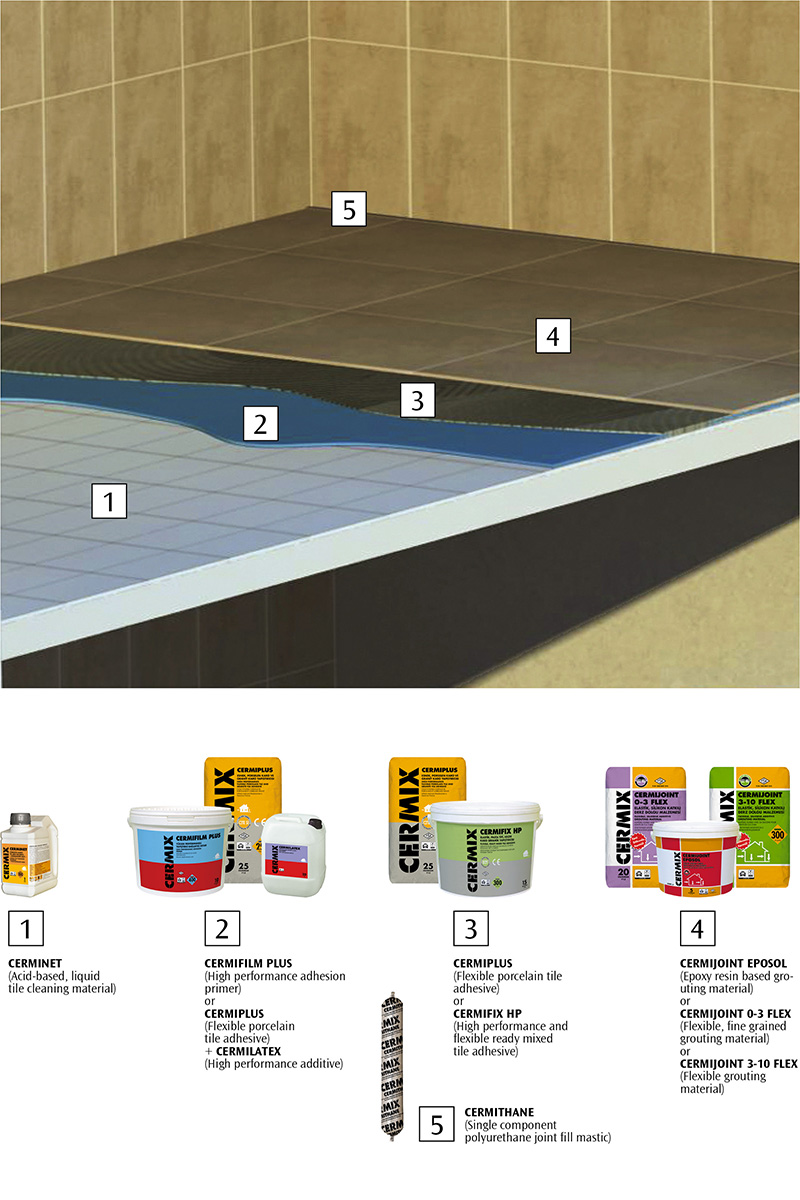
For fixing onto impervious surfaces like existing tiles the surface must be primed to improve bonding performance of the substrate. As a primer CERMIFILM PLUS is recommended. Wait for 6 hours for the primer to dry.
For fixing tiles select CERMIFIX HP (when fixing high porosity wall tiles no priming is required) or CERMIPLUS.
CERMIFIX HP; the adhesive is ready-mixed and no mixing is required. It is in paste form and can be applied directly for tiling. Never add any additives (water, latex, etc.) into the ready-mixed paste.
CERMIPLUS; gradually add clean water to powder (in quantities as stated in technical legends of products), and mix to a smooth and homogenous paste. It is recommended to use a low cycled electrical drill-mixer for mixing. The paste should be in a consistence such that it does not flow when handled with a trowel. The paste should rest for 5 minutes prior to application and should be applied after remixing.
Apply the adhesive on the substrate (for tile sizes >33x33 cm, adhesive should be buttered onto the tile back as well) with a suitable notched trowel to achieve the required bed thickness. For efficiency in fixing with CERMIFIX HP, V5 or V6 type notched trowels are recommended. Glass tiles, natural stones and marbles should be fixed with double buttering method.
The tiles must be fixed within the open time of adhesive and pressed on with a twisting and sliding action to achieve a good contact. The tile should be gently hammered with a rubber hammer in order to provide the stability of bonding and the adhesive to spread and fully cover the tile back. Lift an occasional tile after fixing to verify that the required contact is being achieved.
Excess adhesive must be cleaned off from the tiles and joints with a damp cloth or sponge before it hardens.
In fixing transparent and light colored tiles and natural stones, a sample application should be carried to observe the possibility of the formation of stain and shades. In case, white coloured adhesive should be used.
To improve the technical performance of the CERMIPLUS, it is recommended to add CERMILATEX into the mixing water in the ratio 1:3 (As for the mixing water; instead of 3 scales of water, 2 scales of water and 1 scale of CERMILATEX). With additive added, CERMILATEX can fix tiles in sizes up to 60x60 cm.
Grouting should start after the adhesive has set and dried. Grouting material’s colour may taint due to adhesive’s cement content and colour.
For grouting application select one of CERMIJOINT EPOSOL, CERMIJOINT 3-10 FLEX, CERMIJOINT 0-3 FLEX according to technical requirements. CERMIJOINT EPOSOL has improved water repellency and chemical resistance, thus it is ideal for grouting on kitchens and wet areas where water, food and chemical surface cleaning material residuals may have corrosive effects on grout surfaces.
While applying the grout, carefully follow the rules and instructions on product packaging and technical legends of the products. For an easier application and to ensure full final product performance, the grout should be applied at an ambient temperature range of +10 °C - +25 °C.
Cement based grouting materials; do not add more water into the mixture or re-wet once the mixture is prepared. This will cause the set grout to be weak. It may also cause discrete holes and grains on grout surface, and surface discolouration and variation which will be more noticable with darker grouting colours.
To improve the technical performance of CERMIJOINT 0-3 FLEX and CERMIJOINT 3-10 FLEX (improved resistance and flexibility and water repellency features), it is recommended to add CERMILATEX into the mixing water in the ratio 1:3 (As for the mixing water; instead of 3 scales of water, 2 scales of water and 1 scale of CERMILATEX).
Grouted surfaces must be protected for at least 24 hours from direct sunlight, frost and rain. The floor may be walkable in 24 hours after grouting and to heavy pedestrian traffic after 72 hours.
If any stains and residues remain after grouting, wait for 10 days and treat the tile with CERMINET tile cleaning material to loosen and remove these residues.
Expansion joints should be incorporated to allow for slight movements due to changes in temperature, humidity and thermal and mechanical loads formed on the surface and substrate. Expansion joints should be provided considering heat transmitting systems and insulation applications, floors exposed to heavy traffic and pedestrian loads, wideness of the area, where tiling meets other materials, along all internal corners, existing movement joints or changes in background material. As described above expansion joints absorbs the stresses formed between different movement capacities of overlapping materials. Thus, it prevents the deformations that may arise in the surface and covering. Expansion joints should be insulated by using proper profiles or mastics. Cementitous grouting materials are not appropriate for expansion joints.
If there exist any expansion joints on the floor, artificial expansion joints should be created. Before laying the covering, cold joints should be formed on the screed within rectangular areas of minimum 4 m x 4 m (for large sized tiles up to 8 m x 8 m) with minimum depth of 1 cm. Spiral or concrete cutting machines can be used for forming the joints. If the area is smaller than 4 m x 4 m, expansion joints should be incorporated in the shape (+) on the area. If this is not possible, expansion joints should be laid within columns. These artificial joints will eliminate the stress formed by the structural movements of the building.
On walls; in internal corners, overlapping wall coverings and on areas > 3 m x 3m expansion joints should be applied.
Expansion joints should have minimum width of 6-10 mm along internal corners (wall and floor intersections) this rule should be followed, and skirting should be fixed upon to the completion of tiling.
No coatings or coverings should be applied on the existing dilatation zones and structural expansion joints in buildings. These zones should be insulated by using proper profiles or mastics.
CERMITHANE mastic can be used to fill expansion joints.