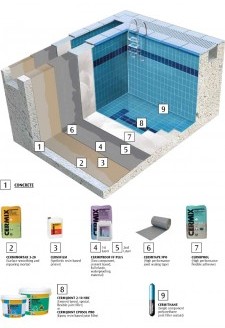
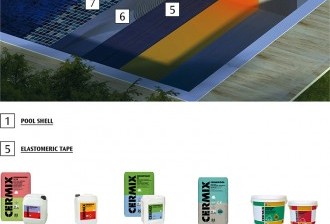
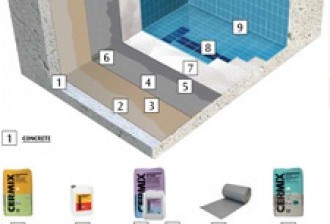
All hydraulic connections, discharge pipes, lighting armatures, drains and faucets should have been placed during the construction of the shell. The pannel wall formwork of the shell should be succeeded with minimized imperfections in the concrete finish.
Before commencing tiling application, pool shell should be filled up with water and waited for 7-10 days to check for any leakages. Any water leakage should be repaired with suitable products. Then, waterproofing application should be completed prior to fixing tiles.
For repairing and plastering works on shell surfaces, 25 kg of CERMIMORTAR 3-20 is mixed with 2,0 lt of CERMILATEX and 4,0 lt of clean water to a smooth and homogenous paste. It is recommended to use a low cycled electrical drill-mixer for mixing. The paste should rest for 5 minutes prior to application and should be applied after remixing.
CERMIMORTAR 3-20 should be applied with a maximum thickness of 7 mm. Apply the plaster following the instructions on product packaging and technical data sheets. In case of complete plastering of the surface, wait for at least 6 weeks for the plaster to complete its final setting.
Waterproofing application should be held on all surfaces of shell with CERMIPROOF FF, cement based, two component, and full elastic waterproofing material.
High porosity substrates should be primed with CERMIFILM before applying CERMIPROOF FF. Priming will balance the water absorptivity of the surface and enhance bonding adherence. Wait for at least 3 hours for the primer to dry and then continue to waterproofing application.
Mix two components of CERMIPROOF FF to a smooth and homogenous paste. It is recommended to use a low cycled electrical drill-mixer for mixing. The paste should rest for 3 minutes prior to application and should be applied after remixing.
CERMIPROOF FF is applied over the surface using a stiff brush or a paint roller at a minimum rate of 1,5 kg/m2 (corresponding a coat thickness of 1 mm). It should be applied over the surface spreading out evenly and ensuring full overlap between each brush or roller application.
2 coats of application are recommended, ensuring a total thickness of 2-3 mm at minimum. The second coat should be applied as soon as the first coat has dried
(reached initial set of 6 hours). Apply the second coat in right angles to the first coat application direction to ensure a pinhole free application (in practical, application is recommended in such that first coat in horizontal and second coat in vertical directions).
Reinforcement with flexible tape or alkali resistant reinforcement mesh should be performed in order to prevent any water leakages at cold joints (internal corners).
Reinforcement is embedded in the first coat of waterproofing, when the coat is still wet, as recommended by the reinforcement manufacturer. Upon drying of the reinforced first coat, second coat should be applied as described above. Insulation details of structures on the covering (such as lighting armatures, discharge pipes, drains and faucets) should be figured out with appropriate waterproofing solutions.
Application on hot surfaces and during sunny weather is not recommended. Cracks may happen due to sudden shrinkage.
Following application must be done at least 48 hours later after waterproofing material has set.
For fixing tiles select CERMIPOOL.
Gradually add clean water to powder (in quantities as stated in technical legends of products), and mix to a smooth and homogenous paste. It is recommended to use a low cycled electrical drill-mixer for mixing. The paste should be in a consistence such that it does not flow when handled with a trowel. The paste should rest for 5 minutes prior to application and should be applied after remixing.
Fixing with CERMIPOOL; apply the adhesive on the substrate (for tile sizes >33x33 cm, adhesive should be buttered onto the tile back as well) with a suitable notched trowel to achieve the required bed thickness. Glass tiles, natural stones and marbles should be fixed with double buttering method. The tiles must be fixed within the open time of adhesive and pressed on with a twisting and sliding action to achieve a good contact. The tile should be gently hammered with a rubber hammer in order to provide the stability of bonding and the adhesive to spread and fully cover the tile back.
Lift an occasional tile after fixing to verify that the required contact is being achieved.
Excess adhesive must be cleaned off from the tiles and joints with a damp cloth or sponge before it hardens.
Grouting should start after the adhesive has set and dried.
For grouting application select one of CERMIJOINT EPOSOL or CERMIJOINT 2-10 HRC according to technical requirements. These products provide improved water repellency features and resistance to chemicals that the water may contain for hygienic care.
While applying the grout, carefully follow the rules and instructions on product packaging and technical legends of the products. For a easier application and to ensure full final product performance, the grout should be applied at an ambient temperature range of +10 °C - +25 °C.
For cementitous grouts; do not add more water into the mixture or re-wet once the mixture is prepared. This will cause the set grout to be weak. It may also cause discrete holes and grains on grout surface, and surface discolouration and variation which will be more noticable with darker grouting colours.
For a easier application and to ensure full final product performance, the grout
should be applied at an ambient temperature range of +10 °C - +25 °C.
Grouted surfaces must be protected for at least 24 hours from direct sunlight, frost and rain.
If any stains and residues remain after grouting, wait for 10 days and treat the tile
with CERMINET tile cleaning material to loosen and remove these residues.
Expansion joints should be incorporated to allow for slight movements due to
changes in temperature, humidity and thermal and mechanical loads formed on the surface and substrate. Expansion joints should be provided along all internal corners, existing movement joints or changes in background material. As described above expansion joints absorbs the stresses formed between different movement capacities of overlapping materials. Thus, it prevents the deformations that may arise in the substrate and covering. Expansion joints should be insulated by using proper profiles or mastics resistant to continuous water contact. Cementitous grouting materials are not appropriate for expansion joints.
Expansion joints should be provided at intersection points of deck and the shell of swimming pool.
Insulation details of structures on the covering (such as lighting armatures, discharge pipes, drains and faucets) should be sealed with CERMISIL NS.
CERMITHANE mastic can be used to fill expansion joints.
Wait for at least 7 days before filling the pool with water after finishing all tiling process.
Daily filling and discharging rates of water into the pool should be managed according to the specifications. Care should be given to the heating rate of water for thermal pool applications, and a heating rate of 0,25 °C / 1 hour should be ensured. Faster rates than specified may cause expansion problems and deformations on the covering.


